Microblading FAQ's
FAQ's
Frequently asked questions.
What is microblading?
Eyebrow microblading is known by several names, including microstroking, micropigmentation, eyebrow embroidery, eyebrow feathering, and 3D eyebrows. Although the names differ, the procedure is the same. Microblading fills in sparse areas of your natural brow, which is done by using a very fine blade to deposit pigments into the dermal layer of the skin. The result is a natural, real life looking hair stroke.
Who is a good candidate for microblading?
Those with alopecia or damaged hair follicles as well as those with sparse or thinning brows. Even those with thicker eyebrows can benefit as well. It is a great alternative to having to ‘fill in’ brows daily.
Who is NOT a good candidate for microblading?
MICROBLADING IS NOT RECOMMENDED FOR ANYONE WHO IS OR HAS THE FOLLOWING:
- Sick with cold, flu, or sinus/respiratory infection (please reschedule your appointment and stay home to recover)
- Skin irritations including: sunburn, rash, eczema, shingles, acne, or psoriasis near the treated area
- Pregnant or nursing
- Under age 18
- Skin irritations (sunburn, rash, eczema, shingles, acne) or psoriasis near the treated area
- Had Botox within 3 weeks from scheduled appointment
- Used Accutane in the past year
- Diabetes
- Epilepsy
- Undergoing chemo
- Prone to keloid scarring
- Pacemaker or major heart problems
- Had an organ transplant
- Viral infections and or diseases
- Transmittable blood disease, HIV or Hepatitis
How long does it last?
The healed results of microblading last between one and three years. Usually powder or ombre brows last between 2-3 years. The variation in time is determined by lifestyle, sun exposure and skin type. Someone with an oilier skin type tends to experience results that fade quicker compared to someone with a drier skin type. Therefore, touchups may be more frequent.
How often will I need a touchup?
How often you will need a touchup is based on several factors. Lifestyle, sun exposure, and skin type will greatly determine how long your microbladed brows will last. I highly recommend a touch up between 12-18 months to maintain the shape/color of your brows. 12-18-month touch ups are half of original cost. Any touch up beyond 18 months is full price. Please note: Oilier skin types can experience pigment fading much quicker than dry skin types and may need to come in sooner than 12 months.
Do you offer consultations?
Due to my extremely busy schedule I do not offer consultations beforehand. However, I do provide same day consultations. Meaning, we will go over all information before the appointment is started. An exception to this rule is any client that has had previous work done by another artist. You MUST have a consultation before an appointment is scheduled to determine if my services are the best option for you.
Is it painful?
Keeping in mind that pain is subjective, most clients say they experience no discomfort during microblading. Any pain that was experienced has been compared to the feeling of a light scratch with minimal discomfort. I use a specialized technique to apply a topical anesthetic to provide a comfortable microblading experience. Some clients have even been able to take a nap while undergoing their eyebrow transformation.
How do I prepare for my appointment?
SUGGESTIONS / REQUIREMENTS BEFORE Eyebrow MICROBLADING:
- No Botox treatments should be done 3 weeks prior or 4 weeks after procedure
- No chemical peels 60 days before or after procedure (brows will peel quicker due to chemicals traveling under the skin)
- No Retinols/Retin-A or other anti-aging/acne creams, or serums containing acids as these will fade brows prematurely
- Do not work out or sweat heavily the day of the procedure (Or 2 weeks after)
- Do not tan or have a sunburned face the day of the procedure
- Do not take aspirin, niacin, vitamin E, or ibuprofen 48 hours before procedure
- No waxing or tinting 3 days before procedure
- No alcohol or caffeine 24 hrs. before procedure
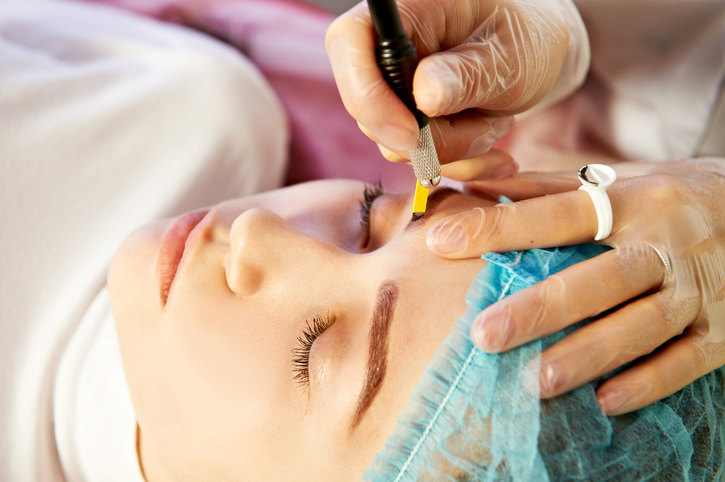
What is the microblading process like?
Microblading Process
There is never a rush during any part of the microblading process, so it’s important to know beforehand how long microblading takes for planning purposes. The average microblading appointment usually takes two hours from beginning to end. We make sure that you’re comfortable through every step of your eyebrow transformation. The steps we follow for a microblading appointment are listed below.
***Feel free to come to your microblading appointment with your full makeup on, especially your eyebrow makeup. It can be helpful to see your made-up brows for a color reference when choosing the right ink color for your brow transformation. Pictures - Microblading before and after pictures are a great way to see your brow transformation, so we snap a few quick pictures of your eyebrows before getting started, and then a few more after they’ve been microbladed. Consultation - We both must be on the same page in terms of eyebrow shape, and color, to give your brows the look you want, so there is heavy emphasis placed on understanding your expectations, and also helping you understand what results are possible through microblading. Brow Shaping - Shaping eyebrows correctly is the foundation to getting perfect eyebrows. Using what is called the golden ratio, your facial features, and some measuring, we draw the perfectly shaped eyebrows for your face directly on your skin for you to see. Approval - You take some time to examine your newly shaped eyebrows. We won’t move forward with anything until you are completely happy with your brow shape, and if that means some adjustments need to be made, then so be it. Numbing - At some point you’ve probably wondered, “does microblading hurt?” After a topical anesthetic is applied by using a specialized technique, pain is not an issue. Some clients have fallen asleep during the microblading process, so yes, we make sure you’re comfortable. Paperwork - While your skin is numbing you’ll review and sign consent forms, followed by completing a brief medical history to ensure the microblading procedure won’t interfere with your overall wellbeing. Microblading - All of the skills and mastery of technique come together to transform your eyebrows into a masterpiece. Using a microblade, ink is implanted into your skin by making microstrokes that resemble hair to give you the brows you’ve always dreamed of. Care Instructions - As you’re looking in the mirror obsessing over your new brows, you’ll be instructed on the microblading healing stages, and how to take care of your microbladed eyebrows. We supply you with a special aftercare cream to help your brows during the microblading healing process, and then schedule your touch-up appointment for six to ten weeks later.
The microblading process is finished and you have fallen in love with your eyebrows. People will notice your brows, and whether they say it or not, you’ll be the reason behind their eyebrow-envy. Your brows will inspire them to take theirs to the next level, and that’s when your eyebrow transformation is truly complete.
***Please note skin cells turn over more frequently on oilier skin types causing the color to fade quicker than drier skin types. For oilier skin types more frequent touch ups may be required which are not included in the original price.
How do I care for my brows afterwards?
Microblading Aftercare Instructions
Microblading makes the idea of perfect brows possible, but to ensure that you get the naturally beautiful looking brows you want, following the Microblading Aftercare Instructions is essential. ***FAILURE TO FOLLOW AFTER-CARE INSTRUCTIONS MAY RESULT IN scarring, INFECTIONS, PIGMENT LOSS OR DISCOLORATION.
After the Microblading Procedure:
On the first day a sealer will be applied to your brows at the end of your appointment. 5 hours after your appointment take a clean paper towel, wet with warm water, and gently wipe the sealer off your brows. You may then proceed to apply a small amount of aftercare ointment to your brows with a Q-tip. *If you have dense brow hair, please make sure you are getting under the hair to the skin beneath.*
Days 2-7:
Wash the microbladed area twice per day followed by applying the microblading aftercare ointment.
- At the start and end of each day, use your clean fingertips and a mild antibacterial soap, like Cetaphil or Dial Soap (unscented), to gently cleanse your eyebrows for 10-15 seconds.
- Avoid using any harsh cleansing products that contain exfoliants or acids (glycolic, lactic, or AHA).
- Keep in mind the cleansing shouldn't be a thorough scrub-down, it just needs to be done by rubbing the microbladed area in a soft, smooth manner.
- When rinsing, be sure to rinse every trace of soap from the microbladed area.
- Dry the entire eyebrow area completely by blotting it with a clean paper towel.
- Use a Q-tip to apply a small amount of the microblading aftercare ointment to the microbladed area. If you have extremely oily skin, you may need to skip this step.
- Less is more when considering how much ointment to apply; the amount applied to each eyebrow should be comparable in size to a grain of rice.
- Microblading aftercare ointment should only be applied twice per day following the washes to avoid suffocating the skin and interfering with the skin’s natural healing process.
Days 8-14:
At this point you may stop washing and applying the ointment to your brows. However, if your brows still seem dry, you can continue to apply a very small amount of aftercare ointment. *Use discretion as using too much can cause strokes to blur* You will also need to continue avoiding certain things until your healing is complete. See below.
Things to Avoid for the entire 14 day healing period:
***It's critical to avoid the following for 14 days after your microblading procedure.
- Touching the microbladed area except when washing or applying aftercare ointment.
- Scratching, picking or peeling the microbladed area, as it can cause scarring and/or color loss.
- Applying any makeup, moisturizer, lotion, or sunscreen to your face. Sun exposure - sun tanning - salon tanning
- Laser or chemical peels, and any other form of exfoliation.
- Exercise - participating in sports and activities that induce perspiration
- Long, hot baths or showers - Jacuzzis - saunas - swimming
- Applying any creams to your face or neck containing retinol or glycolic acid.
- Engaging in tasks like heavy household cleaning where airborne debris can become prevalent.
- Drinking excessive amounts of alcohol, as it can cause wounds to heal slower.
After Day 14:
Resume your normal activities except, continue to avoid laser or chemical peels and forms of exfoliation, and any creams containing retinal or glycolic acid until after the completion of your microblading touch up appointment, and its healing process as well.
What does the healing process look like?
Microblading Healing Process
Trust the process
Healed microblading results are the most beautiful and natural looking way to enhance eyebrows, but the path leading to those anticipated healed results can be a little bit surprising. In addition to following the microblading aftercare instructions, understanding the microblading healing process is essential to avoid undue worry and stress while going through the different stages of healing.
When it comes to understanding the microblading healing process, the best way to start is by emphasizing the word “process.” Since microblading involves cutting into the skin, clearly there’s going to be a healing process, just as there is for any other wound. However, unlike those other wounds, the fine cuts made by microblading are expected to heal in a way that the healed microblading results mimic the appearance of natural eyebrow hair; which heightens the concern for correctly healed results for anyone going through the healing process. There are stages of the healing process that can cause many, especially those who aren’t prepared with what to expect, to wonder if eyebrow microblading was a mistake. To help reduce the drama, the microblading healing process is described below:
*Please note: everyone heals differently so these times are only a general guideline.
Microblading Healing Timeline
Day 1:
Eyebrows look amazing immediately after microblading appointment Pigment gradually gets darker throughout the day
Week 1:
Pigment reaches darkest level on day two Light scabbing develops where microblading strokes occurred
Week 2:
Scabbing from microblading strokes begin to peel and flake off, sometimes revealing no definite, visible color in skin
Weeks 3-4:
Pigment in skin continues to oxidize and microbladed strokes begin to reappear in color intended from the beginning, but some strokes come back looking patchy
Week 6:
Eyebrows fully healed and ready to undergo the finishing effects of touch-up appointment Beautiful eyebrow enhancement/transformation is complete after final touch-up
Microblading touch-up appointment
Gorgeous microblading results are best achieved by dismissing any doubts while undergoing the healing stages of microblading, and continuing to follow the microblading aftercare instructions. Not only is healing a process, but microblading itself is as well. The initial appointment is essential for laying a good foundation, but the final touch up appointment is where the process is completed. Trust the process!
